Mining Litecoin (LTC) on Google Compute Engine with Windows 8
Thanks to the help of a few sites I have been able to set up the new Google Compute Engine to work with LTC CPU Miner.
If you enjoy this post and are in a giving mood I would welcome some Bitcoins or Litecoins :)
To help make it a but easier, I pasted the instructions from these page below, but made a few changes to reflect the experience I had
Before you start make sure you sign up for Google Cloud Compute Engine and create a Project ID: https://cloud.google.com/products/compute-engine/
If you enjoy this post and are in a giving mood I would welcome some Bitcoins or Litecoins :)
- BTC Address: 1G67tkTzyfoQ9rKay6gRWvWeiiNVBEQWax
- LTC Address: Li9PrmRwLCKV5VkJiHHcL8BLd7Ts28XBSZ
Thanks to these links and a bit of trial and error (1st time user of Cygwin)
- Set up Cygwin: https://developers.google.com/compute/docs/gcutil/
- Set up my VM: https://developers.google.com/compute/docs/quickstart
- Set up CPU Miner: https://bitcointalk.org/index.php?topic=55038.0
Troubleshooting Lings
- Trouble Shooting ssh: http://superuser.com/questions/363141/using-git-through-cygwin-on-windows-8/$privUrl
LTC Pool
You can use any LTC pool your would like. The below instructions are tested with http://give-me-coins.com/. This pool allows you to run on port 80To help make it a but easier, I pasted the instructions from these page below, but made a few changes to reflect the experience I had
Before you start make sure you sign up for Google Cloud Compute Engine and create a Project ID: https://cloud.google.com/products/compute-engine/
Installing gcutil
This section discusses how to install gcutil on your computer.
gcutil is distributed as part of the Cloud SDK, which contains tools and libraries for managing resources on Google Cloud Platform.
Copy and Paste Tip: When in the Cygwin Terminal window right click for copy and paste functions
- Download and install Cygwin. (32bit Version)Cygwin's website contains installation instructions. While installing Cygwin, be sure to select
openssh,curl, and the latest 2.6.x or 2.7.x version ofpythonfrom the package selection screen. - Here are some screen shots on what I selected for the Cygwin installation packages.
On the below images it says Reinstall, if it’s your 1st time installing it should say Install
i.

Openssh
ii.

Curl
iii.
2.7.x
version of python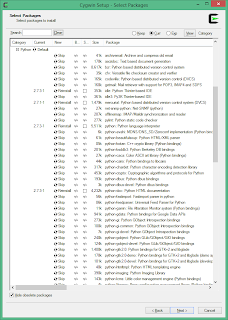


- Start Cygwin.By default, you can launch Cygwin by going to
Start -> All Programs -> Cygwin -> Cygwin Terminal. - Download the Cloud SDK and install it.You can download and install the Cloud SDK by issuing the following commands from Cygwin:
$ curl https://dl.google.com/dl/cloudsdk/release/install_google_cloud_sdk.bash | bashFollow the prompts to complete the setup. When prompted if you would like to update your system path, selecty. - Restart Cygwin (or logout).
Authenticating to Google Compute Engine
Google Compute Engine uses OAuth2 to authenticate and authorize access. Before you can use gcutil, you must first authorize the Cloud SDK on your behalf to access your project and acquire an auth token. You won't need to repeat these steps unless you delete your stored credentials file or remove Google Compute Engine access to your Google account.
- Run
gcloud auth login--no-launch-browser , the tool will print out a verification code that you can copy and paste into a browser $ gcloud auth login --no-launch-browser Go to the following link in your browser: https://accounts.google.com/o/oauth2/auth?scope=https%3A%2F%2Fwww.googleapis.co%2Fauth%2Fappengine.admin+https%3A%2F%2Fwww.googleapis.com%2Fauth%2Fbigquery+https%3A%2F%2Fwww.googleapis.com%2Fauth%2Fcompute+https%3A%2F%2Fwww.googleapis.com%Fauth%2Fdevstorage.full_control+https%3A%2F%2Fwww.googleapis.com%2Fauth%2Fuser... Enter verification code:- Grant access.In the browser window, review the application permissions and click Accept when you are ready copy and paste the printed code on the next page onto the command line.
- Next, the tool will prompt you for a project ID to use as your default project. Enter the ID of the project you want to use for Google Compute Engine:
You can list your projects and create new ones in the Google Cloud
console at https://cloud.google.com/console. If you have a project
ready, you can enter it now.
Enter a cloud project id (or leave blank
to not set): myproject
Add a firewall
By default, Google Compute Engine blocks all connections to and from an instance to the Internet. To install Apache and serve web pages, you need to create a firewall rule that permits incoming HTTP traffic on port 80.
Every project comes with two default firewalls:
- A firewall that allows SSH access to any instance.
- A firewall that allows all communication between instances in the same network.
You must manually create a firewall rule that allows HTTP requests to your instance. For this example, create a new firewall using the following
gcutil command:$ gcutil addfirewall http2 --description="Incoming http allowed." --allowed="tcp:http"
INFO: Waiting for asynchronous operation to complete. Current status: RUNNING. Sleeping for 5s.
+---------------------+------------------------------------------------+
| property | value |
+---------------------+------------------------------------------------+
| name | operation-1340145141786-4c2dadb1ed2a0-578a4b5e |
| creation time | |
| status | DONE |
| progress | 100 |
| statusMessage | |
| target | httpstuff |
| target id | 12918719030692922187 |
| client operation id | |
| insertTime | YYYY-MM-DDT22:32:21.786 |
| startTime | YYYY-MM-DDT22:32:21.964 |
| endTime | YYYY-MM-DDT22:32:22.976 |
| operationType | insert |
| error code | |
| error message | |
+---------------------+------------------------------------------------+
By performing this command, you have:
- Created a new firewall named
http2that allows tcp:http traffic - Assigned the firewall to the
defaultnetwork in the project. We didn't specify a network for the firewall rule, so it was automatically applied to thedefaultnetwork. - Allowed all sources inside and outside the network (including over the Internet) to make requests to the server. We didn't specify a permitted source for the firewall, so all sources are allowed to make requests to instances assigned to the
defaultnetwork (source 0.0.0.0/0is the default setting, meaning all sources are allowed). - Applied this firewall rule to all instances on the network. Because we did not specify a target for your firewall, the firewall applies this rule to all instances in the network.
To review information about your firewall at any time, perform a
gcutil getfirewall request:$ gcutil getfirewall http2
+---------------+-------------------------+
| property | value |
+---------------+-------------------------+
| name | http2 |
| description | Incoming http allowed. |
| creation time | YYYY-MM-DDT22:32:22.347 |
| network | default |
| source IPs | 0.0.0.0/0 |
| source tags | |
| target tags | |
| allowed | tcp: 80 |
+---------------+-------------------------+
Whenever you create a firewall, you can restrict the sources and targets to specific callers and instances using appropriate
addfirewall flags. To see a complete list of supported flags, run gcutil help addfirewall. See Networking and Firewalls for more information about how networking works in Google Compute Engine.Create an instance
Next, we need to add and start a new virtual machine instance. Adding an instance creates a persistent virtual machine instance running on the Google Compute Engine infrastructure. You can log in to these instances, configure them, install software, run software, create a network, create a server farm, and much more. You can also delete your instances when you no longer need them.
When you create an instance without attaching a disk, Google Compute Engine will also create a root persistent disk for you, with the image that you specified. The root persistent disk will store the root filesystem and OS image that your instance needs to boot.
Here are the steps to creating your first instance:
- Create and Start Your InstanceTo create an instance, you need to execute the
addinstancecommand:gcutil addinstance <instance-name>where<instance-name>is a name that you choose. Your instance name must adhere to the restrictions described on the Instance resource page. For this example, name your instancemy-first-instance:$ gcutil addinstance my-first-instance --wait_until_runningTheaddinstancecommand asks you to choose the following settings for your instance:- Select the
us-central1-azone from the listEvery instance must live in a zone, which represents the physical location where your instance is stored. Typically, you should select the zone closest to where you are serving data. - Select one of the High CPU machine types
Details here: https://cloud.google.com/products/compute-engine/#pricingSelect the image named Debian - debian-7-wheezy. - Select a passphrase for ssh keysIf this is your first time using gcutil to add an instance, you will be asked to create a passphrase to protect your ssh keys.
- Select the
- (Optional) Check Instance StatusAfter calling
gcutil addinstance, Google Compute Engine will launch your instance. Before you can use your instance, however, you must wait for your instance to report its status asRUNNING. If you didn't use the--wait_until_runningflag with theaddinstancecommand, you can check on the status of the instance by querying Google Compute Engine. To check the status of your instance, execute the following command:$ gcutil getinstance my-first-instance
Change the windows folder permissions for ssh to work
- Find your .ssh folder
Default locations is: C:\cygwin\home\username\ - Access the
Propertiesof the .ssh directory - Click
Advancedon theSecuritytab Changethe owner to yourself. You can type in your first name or associated email addressRemoveany unknown users from the list- Click
Enable Inheritance - Check `Replace all child object permission entries with inheritable permission entries from this object
- Click
OKat the bottom and thenYesto the dialog box.

Log in
The
gcutil tool has a built-in ssh command that enables you to ssh into an instance using the instance name.
To log in to your instance, execute the following command:
$ gcutil ssh my-first-instance
The SSH keys you created previously will be used to authenticate your SSH session. You should now be at the command prompt in your instance's home directory.
Once you have logged in, you can do anything you could do on any other standard Linux machine, including installing applications. You have root permissions on your instance and full control over everything.
Install and Run CPU Miner
Building instructions
Installing dependencies for building on Debian, Ubuntu and other APT-based distros:
Installing dependencies for building on Debian, Ubuntu and other APT-based distros:
Code:
$ sudo apt-get install build-essential libcurl4-openssl-dev
Code:
$ wget http://sourceforge.net/projects/cpuminer/files/pooler-cpuminer-2.3.2.tar.gz
$ tar xzf pooler-cpuminer-*.tar.gz
$ cd cpuminer-*
$ ./configure CFLAGS="-O3"
$ make
$ tar xzf pooler-cpuminer-*.tar.gz
$ cd cpuminer-*
$ ./configure CFLAGS="-O3"
$ make
Basic usage examples
CPU Miner users: use "stratum+tcp" on the host configuration.
Code:
$ ./minerd --url=http://myminingpool.com:9332 --userpass=my.worker:password
$ ./minerd --url=stratum+tcp://myminingpool.com:3333 --userpass=my.worker:password
$ ./minerd --url=stratum+tcp://myminingpool.com:3333 --userpass=my.worker:password